#sync google drive and icloud
Explore tagged Tumblr posts
Visit Tumblr Blog
Explore Tumblr blogs with no restrictions, modern design and the best experience.
Last Seen Tumblr Blogs


Fun Fact
Tumblr has 16.74 million mobile monthly users in the US.
Text
Obsidian is great! I started using it to run my solo 5e campaign, but have been using it this past few weeks as well to store my research, etc for some original works I've been working on. It has so many plugins that are great for a wide variety of things.
Just as a note, you can pay for the syncing service (which helps support the software development), especially if you want to be able to open your vaults on like an iOS device without having to jump through five million hoops -- but if you have a cloud service that syncs your files, it auto saves and syncs across devices.
I use Dropbox and hop between my laptops on multiple vaults. I have yet to see any corruption or syncing issue (like you sometimes get with Scrivener if you don't cross your eyes the right way and remember to always close out your program and let everything sync). And it always seems to remember what note I had open last whenever I relaunch.
hey if you're the type of writer that's like me where you tend to write specific scenes first that vaguely weave together into a plot, you might like using obsidian as a writing app.
my frustration with other writing applications is that i will write my scenes out of order and it's hard to move things around and rearrange them on a regular document.
but with obsidian there's this canvas feature where you can just write all your scenes and plot moments on these little cards that you can freely rearrange. you can color code them and connect them too.
here's the canvas i've created for my current multi-chapter fic: (if you zoom in you can see all the text in each card this what it looks like zoomed out)

as you can see, i color code them based off chapters and will group them next to a document card with the working title of the chapter. anything not color-coded are scenes that don't have a proper place quite yet or it's just world building references. this app can also be good for note-taking and collecting research!
best of all, it's FREE!!! the only downside is that if you want your stuff to sync across devices, you do have to pay for that. i constantly hop between my laptop and desktop so i pay for the syncing. but if you write on only one device it's completely free!
i typically use it for organizing my thoughts for a first draft. once i get all the scenes arranged and mostly written out, i will copy and paste them into ellipsus (also free & highly recommended as a google doc alternative) so that they're all in one document that i can edit.
#i haven't used icloud onedrive or google drive to sync so ymmv with those cloud sharing services#but i can attest it's rock solid with dropbox syncing#i could gush about obsidian until the cows come home#i still split my writing time between it and scrivener#but it's so much fun to play with the vaults and the plugins
6K notes
·
View notes
Text
Top 8 Best Alternatives to Cloud Storage Services
Storing and syncing files in the cloud makes things simpler and keeps your files safe. The best cloud storage services help you easily share and access files from any place and restore them if something goes wrong. What Can Cloud Storage Do for You? Cloud storage services let you store things like Word docs, PDFs, photos, and spreadsheets, and access them anytime. They also automatically make…
#Apple iCloud#Apple iCloud Drive#Box#Cloud Storage Alternatives#Dropbox#Google Drive#IDrive#Microsoft OneDrive#Proton Drive is#Sync
1 note
·
View note
Text
PDF Expert for Mac: My Indispensable Tool for Document Management
As someone who handles digital documents daily, I’m always looking for tools that simplify and optimize my workflow. After trying various applications, I found the perfect solution in PDF Expert for Mac. This tool has not only boosted my productivity but also transformed how I manage my PDF files. Let me share my experience and the incredible features of PDF Expert. Easy to Use Right from the…

View On WordPress
#best PDF editor#cloud sync#digital signatures#drag and drop PDF#Dropbox integration#easy PDF editing#fast PDF viewer#file organization#Google Drive integration#iCloud integration#intuitive PDF tool#merge PDF files#PDF annotation#PDF document management#PDF Expert for Mac#PDF form filling#productivity tool#review and comment PDF#seamless PDF workflow#split PDF documents
0 notes
Text
Syncthing, ovvero come liberarsi dalle limitazioni di Dropbox e affini
— Fonte: JJ Ying su Unsplash. Proprio come VisiCalc, WordStar, Photoshop, Hypercard o Netscape, Dropbox è stato uno di quei (pochi) software davvero innovativi e capaci di cambiare la vita dei suoi utilizzatori. Se oggi l’idea di sincronizzare i propri file attraverso la rete sembra naturale, nel 2008 l’uscita di Dropbox rappresentò una vera e propria liberazione dalla schiavitù delle chiavette…

View On WordPress
0 notes
Text
i have opinions about how we fanfiction for the internet, and i don't mean literary or aesthetic ones: i mean your experience of writing it!
this is just my markdown manifesto again:
there is no reason to tangle with google or microsoft for writing copy that will ultimately be rendered as HTML on ao3 and tumblr!! rich text editors are slow as hell on desktop and mobile, both in performance and how much time you waste formatting, which takes your hands from the keyboard whether physical or touchscreen. most users end up redoing that formatting entirely in their destination site's embedded rich text editor and inevitably miss things anyway!! google docs and microsoft word and their ilk were made for printed documents no matter how much they try to mutate to stay relevant—i'm side-eying google's "paste markdown" here, nevermind gemini and copilot!
commonmark markdown is quick and easy to learn. enable markdown on tumblr and all you have to do to is copy and paste (only on desktop, unfortunately). if you don't bother with headers or dividers, the most you have to do afterwards is add a "read more" cut. ao3 is less perfect; you might have to ctrl+R formatting marks for the plain text editor and annoyingly add forward slashes to end tags, but there's still explicit fidelity to the formatting you defined while writing that the clipboard cannot lose. yes, i know "paste with formatting" exists, but it's not a problem for me because I live like this. in markdown, your writing isn't tied to any website or service; it's really yours.


that said, you still need a markdown editor, and there are several:
obsidian.md (windows/android/mac/iOS/linux): i used this for more than three years for grad school and writing. i still use its android app since i sync my notes with a git repo instead of the cloud. without paying for obsidian sync, you can keep your vault in your desktop icloud or google drive folder so you can access it from your phone. it's a great way to learn a version of markdown and get comfortable with just how lightweight and portable your drafts can be. this is a good fit if you've ever used and liked notion and want to focus on words
@ellipsus-writes (web app in open beta; no mobile app yet but the mobile site is functional): they don't market themselves as a markdown editor and clearly aim to replicate a gdocs/word-like, mouse-dependent formatting experience, but they support markdown! if you feel trapped by google because of file sync and being able to share docs privately, this is one of your best bets. i haven't tried this, but i think exporting your work from ellipsus as a .md file and then pasting it into tumblr is Great option
i haven't tried these extensively/recently but know they're out there:
simplenote (android/iOS/windows/macOS/linux): i used this forever ago and it looks like it's grown a lot!
bear (macOS/iOS only)
and another thing is: i think it's nice to use different programs for different parts of life. i use google docs for work and yes, using their awful markdown support, but it still makes a difference to write my fanfiction somewhere else (in the terminal, because i'm the most annoying person alive)!! compartmentalize beyond different accounts, don't let the bastards get you down or make you dependent on them
also i'm not gooning for a brand here i personally use neovim
10 notes
·
View notes
Note
I saw that you use a tablet, a desktop, and paper notes. How do you conciliate those notes?
Is there a mechanism of making primary notes on one resource and then passing those notes to other while reviewing them?


hi! thanks so much for asking! here are my favorite methods for sharing notes between devices :). i personally have apple devices so i can fairly easily airdrop and sync things between devices, but i also frequently work at the library desktop computers where i can't do that! so here's my tips and tricks for sharing notes between devices
for context: i've been mostly doing digital notetaking recently, but i also like to scan my paper notes as well!
i'm going to be dividing this post into 2 methods! (there will be some overlap). syncing already written notes and syncing notes (in progress) between devices
for already written notes:
the first step i would take is export your notes as a pdf or any other file type. if they're handwritten try going into your notes app (for ios) or downloading a pdf scanner app for your phone! if your notes are digital check the sharing options in your app to see if there's anything about "exporting".
personally, i like to use either discord or notion. i have created a discord server with only myself that i use just for sharing links/files/anything between devices! i like discord because there's apps for pc, mac, tablets, and phones; and even a web app! discord is really nice and fast, and you can make different channels (as pictured below) for organization. as long as your file size isn't too big, you should be fine.

my second app i like to use is notion! notion is such a beast in itself, but i like to use it to upload files and images and links! below are two ways i have used it: to upload pdfs/files, and to upload goodnotes (my notetaking app) links to the pages i'm writing on! similar to discord, notion has apps for all devices, but it also works great just by itself on the website (no app required)! it's really great to access it from all my devices.


another way you could share your notes on different devices is through the cloud! (yes, discord and notion are both through the cloud). google drive, microsoft onedrive, icloud storage, etc. are great tools that you can use to upload files and see on multiple devices. i personally like discord and notion more, just because they're already apps i frequently use, but if you can't get either one cloud-based storage platforms are also a great idea! they definitely have more security than discord or notion, because your files may be at risk of being deleted!
for the purposes of sharing notes to reference on another device when writing an essay, or something of similar vain, i really love discord and/or notion and they both work great!
for syncing notes in real time:
pretty similar to the last one, i would say notion or google docs (or microsoft word on the web i believe has similar functionality, or onenote, anything similar!)
if you want to be writing notes on one device and have them sync up quickly on another - i think any word processing software is the best bet for you.
both notion and google docs you can access them on any device, and/or on their websites too!
google docs is a lot more straightforward, but since notion is so powerful it provides a lot of flexibility for your notes! here's an (old) example of notes i've taken on notion. (i personally really like how easy it is to make columns!)
i hope this helped a little bit! please let me know if you have any more questions :)
also! notetaking is very much an individual thing, if something works for me and doesn't work for you - that's okay! we're all learning and just have to figure out what's best for ourselves.
#to: ilyastudies#from: silverfroot#thanks for the ask!#studying tips#studying#studying aesthetic#studyblr#study motivation#university#studyspo#study blog#study inspo#academia#chaotic academia#study aesthetic#study tips#advice#study advice#study methods#study resources#resource#text post#*
31 notes
·
View notes
Text
Writing with Executive Dysfunction (or how to lower the barrier of entry)
So you want to write a book, but all you have is a cool one-liner, a niche super power you want to explore, and the blurry image of a love interest with a two-syllable kind of name. You don’t know where to start, what to tackle first, how to jump in the deep end.
Can you write the ending first? What if you want this really cool gimmick in a fight scene but can’t write action to save your life? Do you start in media res or with a prologue, or with the character starting their daily routine? Do you write the villain’s POV first?
Or do you start with an outline, character sheets, a title, summary, your themes and motifs? How many pages and pages of worldbuilding notes should you have built up before you’re good to tackle the first page? You’ve heard time and again the critical importance of the first three sentences. The first chapter if your audience is generous.
The pressure mounts to be unique, but not try-hard, descriptive but not flowery, intriguing, but not confusing, all in the first hundred or so words. You sit there staring at the little blinking black line on your blank page… and the idea gets shelved for another day. It collects virtual dust in the backlogs of your computer, forgotten until you have to clear out space on your hard drive and stumble across unspent potential.
Everyone and their dog has their own bits of writing advice and I’m sure I’m about to echo tips that have been around the block once or twice, but there are a few I don’t see talked about enough.
Whether you suffer from severe procrastination, fear of failure before you even begin, the overwhelming limitlessness of choice, or just can’t sit down and dedicate any time to see what happens, this list might be for you.
1. Write Every Day
This is nothing new, but I’m going to tackle the implementation of such a habit over why it’s important. You already know why it’s important. Writing every day doesn’t demand a full page of a Word doc, or 200 words before you can get up and do something else. Sometime a witty dialogue exchange comes to mind while you’re doing dishes – write that down.
Or you saw a cool name for a character in a commercial – write that down.
Or you had a dream about your characters in a high-octane street chase – write down the synopsis.
Personally, I use Apple Notes. It’s free, I can log-in to iCloud through a browser and keep writing, and my phone is always with me. I have dedicated folders to sort which notes belong to which concepts.
Disclaimer: Apple Notes is meant for exactly that: Note taking. I take it to the extremes, but it’s not a word processer. It’s not meant for anything more strenuous than putting virtual pen to virtual paper.
I build up so many variations of scene ideas and concepts for character arcs that my ‘notes’ for any given book can be as long as a full-length novel. Most of the time, admittedly, those ideas get outdated fast as I move on to bigger and better things, but the point is this: I never would move on to better things if I didn’t have somewhere to start.
I have a personal grudge against OneDrive for a sync failure losing 20k words of a WIP, so most of my writing is done through Google Docs and saved to Google Drive. It’s not the most powerful word processor, but you don’t have to worry about formatting until the very end and can export later. It’s free, like Apple Notes (assuming you have an iPhone), and the smart phone app for Google programs works phenomenally better than the MS Word app – so once again, the barrier for being within reach of places to jot down ideas is lowered. My phone is always with me.
It doesn’t have to be digital – carry around a journal or a notebook or a legal pad if you want. Whatever gets your creative juices flowing. The point is to have somewhere to take all the ideas you have in your head and get them onto paper the moment inspiration strikes.
2. Writing is Supposed to be Fun
The dreaded writer’s block, scourge of authors everywhere. You’ve reached the point in your manuscript where you’ve caught up to the epic adventure you’ve written in your head. The little writer in your brain has gone on strike and you’re left in the doldrums of how to transition from one chapter to the next. One idea to the next. One scene, one line of dialogue.
Answer: Skip it.
Unless you have a hard deadline to make, writing is supposed to be fun. Your best work comes when you’re passionate about doing it, not when you’re holding your fingers hostage to put something on the page or else.
When you start getting frustrated, walk away. When you get stressed, walk away. The manuscript will still be there once you’ve slept on it for a day or two and you’ll be glad for it. Or, write a different scene. Write a hypothetical scene (more on this point later). Write anything you want and come back to the hard parts later. The gaps will fill eventually, and if they don’t—consider what about that transition or scene is so hard and consider axing it entirely. If it’s frustrating for you, it’s probably boring or unimportant to the reader.
3. Script it
My favorite writer’s crutch is to make a skeleton of the scene I want to have, fill it with dialogue, and move on. The pretty thematic narrative can come later. It’s halfway between an outline and a first draft and, for me, someone to whom dialogue comes easier than narrative, this is another barrier removed to letting creativity flow.
I don’t have to think about dialogue tags or movement of a scene or how exactly I want to structure a sentence or describe the setting. Scripting lets me sus out the pacing of a given scene, test run a conversation I have in my head to see if it might really work before investing all the time and effort of a fully fleshed out first draft, only to erase it all later.
You can do this mid-narrative, too. If you just want to skip over a couple lines that aren’t coming naturally to you, script a vague sense of stage directions until you get to easier narrative and come back later.
When I say scripting, mine look something like this:
Character A (ChA): [position within the setting, tone of voice, any notable gesture or action that enhances the dialogue] “Dialogue.” [specific dialogue tag, if necessary] … (often a paragraph break) … “Dialogue.” Character B (ChB): “Dialogue.” [emotion, reaction, details about the setting that are now important, new revelations by the narrating POV] … “Dialogue,” [action. Tonal shift. Movement] ChA: “Dialogue.” [action] … (scene continues)
In practice:
… ChA: [kicks back against the wall of the room, arms crossed. Annoyed, waiting for ChB to speak first, but they don’t] “Why didn’t you tell me you wanted to leave?” [head tilts, still waiting on an answer ChB isn’t giving] “All you had to do was ask.” ChB: “You were having fun,” [quiet, wringing their hands in their lap on the edge of the bed] “You wanted me there. So I was there.” [huffs, flips their hair back. Not sure how many times they’ve had this conversation. Will always hate parties, not going to suddenly like them just because ChA is there] “You can either have me there, or make sure I’m comfortable. You can’t have both.” ChA: “So now I’m the bad guy.” [foot thumps on the floor like a judge’s gavel] …
Scripting also lets you fill a scene with multiple new characters before you figure out their names or descriptions, tagging their lines with the bare minimum. I often test out entire action scenes (which I loathe writing) in script form, so I know I’m satisfied with the pacing, blocking, and amount of movement before I lock it in and write the first draft of actual narrative. It also forces you to make sure your characters are taking actions and not just sitting at a table like talking mannequins.
Transitioning from script to narrative can be mighty tedious sometimes if you try to fit in chunks of narrative in the exact places you left on your initial pass. Fictional prose is organic, so let it breathe.
Maybe you let a character monologue for too long, or they have too much movement in a scene that becomes unnatural and clunky. Or the entire scene ran away from you because the conversation was just that good. Whatever the case, a script, bare minimum, gets your foot in the door.
4. Write Fanfic
I like sci-fi and fantasy. I also like taking my sci-fi and fantasy characters and throwing them into ‘fanfics’ to test out relationships and start to get a feel for what makes them unique from the rest of the cast.
Sometimes the setting changes to something mundane, sometimes it’s a hypothetical scene that the current pacing of the narrative just doesn’t have room for, or it’s a flashback you’ll never include but want to have written so it’s concrete when you reference it in the present.
It also helps you fall in love with your characters when you can write them without consequence, doing whatever, doing whoever, saying whatever, going wherever. In fanfic, their personalities can start to write themselves and you discover them as you write them. And, hey, sometimes you come up with a concept so good, you change the entire real narrative around to fit it.
All your attention doesn’t have to be on the story you’re actually writing.
5. Keep All of Your Deleted Scenes
I keep so many of mine, the ‘deleted scenes’ doc of one book is 40k words longer than the actual manuscript, filled with numerous variations of the same scene written over and over again in vain trying to keep something that no longer works.
Keep them for several reasons:
It reminds you of how far you’ve come.
You can pick through the bones for bits of dialogue and setting descriptors even if the majority is trashed.
You remind yourself of what didn’t work before, so you don’t fall in that same trap again.
If you change your mind, all you have to do is copy-paste it back in.
6. Remember First Drafts are First Drafts
Let the word spew flow forth from your fingers and don’t look back and start questioning every decision and all its flaws until your creativity tank starts sputtering on empty. It’s supposed to be messy, it’s supposed to have plot holes and typos and inconsistencies and things to fact-check. If you start hyper-fixating on making sure your manuscript has absolutely no errors before moving on to the next chapter, it will never get written, and you’ll convince yourself you’re a terrible writer.
Writing is easy. Revisions are hard. Just as storytelling doesn’t have to be linear, neither does the writing process. If that critical first line just won’t come to you, stuff a mediocre one in its place and move on. Write the ending first. Write all the romantic entanglements first. Write the big climactic argument first and figure out how the rest falls into place around your beautiful centerpiece.
But remember: You do, at some point, have to write the hard stuff. Hopefully, when the time comes, you look at all the rest you’ve written and are proud enough of your progress that those daunting scenes that looked impossible before become much more approachable now. Do it for your future readers who want to know how it ends. Do it for your characters. Do it for you.
67 notes
·
View notes
Text
the thing that gets me about the lack of technological literacy in a lot of young gen z and gen alpha (NOT ALL. JUST A LOT THAT I SEE.) isn't necessarily the knowledge gap so much as it's the lack of curiosity and self-determination when it comes to interacting with technology.
you have the knowledge gap side of things, obviously, which highlights issues related to the experience of using pieces of hardware/software becoming detached from the workings of the hardware/software itself. you start seeing people (so called "ipad kids") who are less and less familiar with the basics of these machines—like knowing how to explore file and system directories, knowing what parts of the system and programs will be using the most power and interacting with each other, knowing what basics like RAM and CPU are and what affects them etc. these aren't things you need to sink a lot of time into understanding, but they seem to be less and less understood as time has gone on.
and this lack of familiarity with the systems at work here feeds into the issue that bothers me a lot more, which is a lack of curiosity, self-determination, and problem solving when younger people use their technology.
i'm not a computer scientist. i'm not an engineer. i have an iphone for on-the-go use and i have a dinky 2017 macbook air i use almost daily. that's it! but i know how to pirate things and how to quality check torrented material. i know how to find things in my system directories. i know how to format an external hard drive for the specifications of my computer. i know how to troubleshoot issues like my computer running slowly, or my icloud not syncing, or more program-specific problems. this is NOT because i actually know a single thing about the ~intricacies~ of hardware or software design, but because i've taken time to practice and to explore my computer systems, and MOST IMPORTANTLY!! to google things i don't know and then test out the solutions i find!!!!
and that sounds obvious but it's so clear that its just not happening as much anymore. i watched a tiktok the other day where someone gave a tutorial on how to reach a spotify plugin by showing how to type its url in a phone's browser search bar, then said "i'll put the url in the comments so you guys can copy and paste it!!!!!" like ?????? can we not even use google on our own anymore?? what's happening???
this was a long post and it sounds so old of me but i hear this lack of literacy far too much and the defence is always that it's not necessary information to know or it's too much work but it is necessary for the longevity and health of your computers and the control you have over them and it ISN'T too much work at all to figure out how to troubleshoot system issues on your own. like PLEASE someone help.
#part of it is at the fault of the technology itself#phones and tablets hide a lot of their system workings in favour of app-forward interfaces#unlike pcs and laptops which have them easily accessible at start up#but once again.... the lack of curiosity... troubleshooting.... problem solving#long post#and this isn't even going into the lack of problem-solving and self-driven research when it comes to interacting with media#the ''what song is this????'' ''what movie is this???'' ''what is this from????'' PLEASE where is the LOOKING the SEARCHING the FINDING OUT
52 notes
·
View notes
Text
خطوات فعالة لمزامنة Obsidian Notes بين الأجهزة دون تكلفة

كثير من المستخدمين يبحثون عن طريقة بسيطة وفعالة لمزامنة ملاحظاتهم في Obsidian بين الحاسوب والهاتف أو بين عدة أجهزة دون الحاجة لاستخدام خدمة Obsidian Sync المدفوعة. سواء كنت تستخدم Windows أو Android أو حتى Linux، توجد حلول مجانية تتيح لك الوصول إلى جميع ملفاتك في أي وقت ومن أي مكان. في هذا الدليل، ستتعرف على أسهل الطرق لتحقيق ذلك باستخدام أدوات مجانية مثل Google Drive وSyncthing، مع شرح خطوة بخطوة لإعداد كل أداة بالطريقة المثلى.
ملخص - يمكنك مزامنة ملاحظات Obsidian عبر Google Drive مجانًا مع الإعداد الصحيح. - إنها سريعة وغير مؤلمة، باستثناء تحذير واحد (مذكور أدناه). - يمنحك Syncthing التحكم الكامل في كيفية ووقت مزامنة ملفاتك دون الاعتماد على السحابة. - يستغرق إعداد Syncthing القليل من العمل اليدوي، ولكنه يعمل في النهاية. إذن لديك برنامج Obsidian يعمل لديك على هاتفك وجهاز الكمبيوتر الخاص بك، ولكن المشكلة أن الاثنين لا يتحدثان مع بعضهما البعض. أنت لا تريد أن تحمل جهازين للوصول إلى خزانتين منفصلتين، ولا تريد أن تدفع 5 دولارات شهرياً فقط لمزامنة ملاحظاتك عبر الأجهزة.
طريقتان سهلتان لمزامنة Obsidian
يمكنك مزامنة ملاحظاتك وتعديلاتك على Obsidian دون دفع أي مبلغ. إليك الخياران: - المزامنة عبر السحابة - المزامنة محليًا عبر اتصال نظير إلى نظير
كيفية مزامنة Obsidian عبر Google Drive
الطريقة الأكثر ملاءمة لمزامنة ملاحظاتك عبر أجهزة متعددة هي استخدام مزود خدمة سحابية تابع لجهة خارجية. أيًا كان المزود الذي تستخدمه بالفعل أو تدفع له يجب أن يعمل بشكل جيد. يحفظ Obsidian عملك داخل مجلدات وملفات نصية يمكنك الوصول إليها وتحميلها في أي مكان، لذا لا يهم ما إذا كنت تستخدم Google Drive أو iCloud أو Dropbox أو أي شيء آخر. سأريك أين تجد تلك الملفات بعد قليل. بمجرد تحميل خزانتك بأكملها (وهي مجرد مجلد واحد)، ستحتاج فقط إلى تطبيق على هاتفك وحاسوبك الشخصي الذي سيُفعِّل المزامنة تلقائيًا. بهذه الطريقة، سيتم تحديث أي تغييرات تجريها على الخزنة في الوقت الفعلي. المزودون الرئيسيون الذين ذكرتهم لذا فإن الفكرة هي: نحدد موقع قبو Obsidian على القرص الصلب الخاص بنا، ونرفعه إلى السحابة، وندع التطبيقات السحابية على هاتفنا وحاسوبنا الشخصي تقوم بالباقي.
قم بإعداد Obsidian على Google Drive
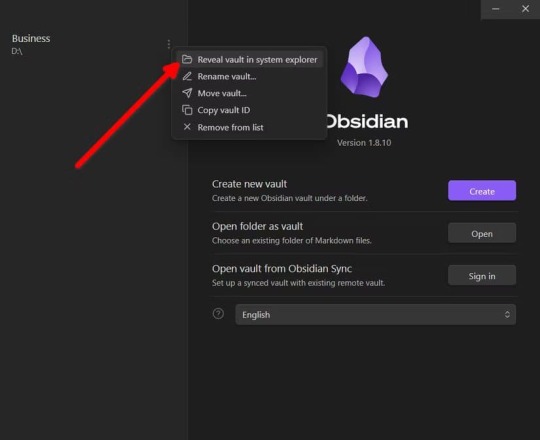
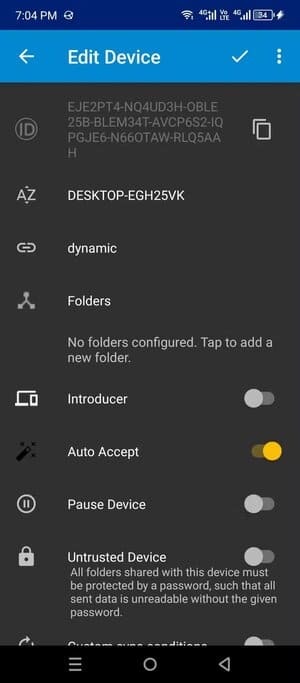
بالنسبة لنظامي Android وWindows، سأختار Google Drive. على جهاز الكمبيوتر الخاص بك على سطح مكتب Obsidian، ستجد اسم الخزنة في الزاوية السفلية. انقر على الاسم ثم ”إدارة الخزائن“.

انقر فوق زر الزاوية هذا إذا لم تتمكن من رؤيته.

ستظهر قائمة بخزائنك على اليسار، بالإضافة إلى بعض الخيارات لإدارة خزائنك (تجاهلها الآن). انقر على النقاط الثلاث بجانب اسم الخزينة وانقر على ”إظهار الخزينة في مستكشف النظام“. سيظهر لمستخدمي ماك ”كشف الخزنة في مستكشف النظام“. تفتح نافذة مستكشف مع تحديد مجلد الخزنة بالفعل. لاحظ موقعه.
ابدأ بتثبيت تطبيق Google Drive على جهاز الكمبيوتر الخاص بك. قم بتنزيل إعداد EXE، وانقر فوقه نقرًا مزدوجًا، وانقر فوق ”تثبيت“، ثم قم بتشغيله.


بشكل افتراضي، سيحاول هذا التطبيق وضع اختصارات لخدمات جوجل العشوائية على سطح المكتب، لذا قم بإلغاء تحديد هذا المربع لتجنب الفوضى. انقر على ”البدء“ وسجِّل الدخول إلى حسابك على جوجل. سيفتح التطبيق علامة تبويب في المتصفح حيث يمكنك تسجيل الدخول. تحذير قم بتسجيل الدخول إلى حساب Google نفسه على هاتفك وحاسوبك الشخصي، وإلا فلن تعمل المزامنة. بعد كل ذلك، سنكون جاهزين لتحميل خزنة Obsidian إلى Google Drive. انقر فوق ”إضافة مجلد“ وحدد نفس المجلد الذي حددناه سابقًا. هذا هو المكان الذي تقوم فيه بتحميل قبو Obsidian الخاص بك.


انقر فوق ”التالي“. ثم مرة أخرى، مرتين أخريين. سيعرض تطبيق Google Drive تحميل صورك ومقاطع الفيديو الخاصة بك أيضًا. تخطى هذه الخطوة ولا تقم بتحميل مخزنك هنا. يجب أن تكون أيقونة Drive الصغيرة موجودة في علبة النظام الآن وإذا نقرت عليها، ستلاحظ أنه يتم ملؤها. هذه هي ملاحظات Obsidian الخاصة بك التي يتم تحميلها ومزامنتها في الوقت الفعلي. سترى أيضًا محرك أقراص تخزين جديد تمامًا في مستكشف ويندوز الخاص بك، موسومًا بأيقونة Drive. يمكنك الوصول إلى جميع مجلداتك وملفاتك هنا. على هاتفك من المرجح أن يكون تطبيق Google Drive مثبتًا بالفعل على هاتفك الذي يعمل بنظام Android. إذا لم يكن كذلك، فما عليك سوى تنزيله من متجر Play. سجّل الدخول إلى نفس الحساب على هذا التطبيق أيضًا. لا يسمح لك تطبيق Obsidian Android بتحميل الملفات من مساحة تخزين Google Drive. سيتعين علينا استخدام تطبيق ثانٍ لتحميل ومزامنة المجلدات المحلية بين تطبيق Obsidian وGoogle Drive. وقد اختبرت تطبيق Autosync لهذا الغرض، ويبدو أنه ينجز المهمة (لكن به بعض الجدران الإعلانية). تحذير يجب أن يتيح لك تطبيق Android مزامنة المجلدات المحلية تمامًا مثل تطبيق Windows، ولكن لسبب ما، لا يدعم هذه الميزة. بالمناسبة، دعنا نطلب من Google جعل هذه الميزة أصلية في Drive. ثبِّت المزامنة التلقائية لـ Google Drive من متجر Play وافتحه. يربط الزر الأول التطبيق بـ Google Drive، ويتيح لك الزر الثاني إعداد مزامنة ثنائية الاتجاه للملفات المحلية على جهاز Android. انقر على ”متصل ب Google Drive“ وقم بتسجيل الدخول باستخدام حساب Google نفسه مرة أخرى. يجب أن تقول ”متصل ب Google Drive“ عند الانتهاء. بعد ذلك، اضغط على ”اختيار ما تريد مزامنته“ و ”إنشاء زوج اختبار“. سينشئ التطبيق تلقائيًا مجلدان جديدان باسم ”DeviceSyncFiles“ على وحدة التخزين المحلية الخاصة بك وعلى Google Drive. لننسخ قبو Obsidian في مجلد ”DeviceSyncFiles“ هذا.


لقد جمعنا كل القطع معًا الآن، وهذا هو المكان الذي يحدث فيه السحر. كل ما نحتاج إلى القيام به هو تحميل مجلد الخزانة من التخزين السحابي (بشكل افتراضي، يتم تشغيله من التخزين المحلي). تأكد من أنك قمت بنسخ جميع خزائنك احتياطيًا في مكان ما قبل المتابعة. على سطح المكتب أولاً، انقل الخزنة إلى مجلد DeviceSyncFiles. ثم دعنا نحمّل تلك الخزنة السحابية على سطح مكتب Obsidian. سنفتح مدير الخزنة مرة أخرى. في الزاوية السفلية، ستجد اسم القبو. انقر عليه مرة واحدة لترى زر ”إدارة الخزائن“. انقر عليه. الآن، اضغط على ”فتح المجلد كخزنة“ وهذه المرة قم بتحميل المجلد من محرك الأقراص السحابي (الخزنة الموجودة في مجلد مزامنة الجهاز).

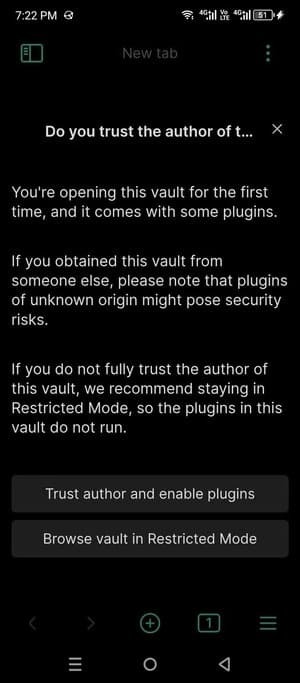
اختر ”الوثوق بالمؤلف وتمكين الإضافات“ إذا طُلب منك ذلك، والآن ستتم مزامنة أي تغييرات تجريها وتحديثها في الوقت الفعلي. على هاتفك لنفعل الشيء نفسه على الهاتف. اضغط على ”فتح مجلد باسم Vault“ وانزل إلى مجلد ”DriveSyncFiles“. انقر على ”استخدام هذا المجلد“ وانقر مرة أخرى على ”الوثوق بالمؤلف وتمكين الإضافات“، وبذلك تكون قد انتهيت!

من هنا فصاعدًا، ستتم مزامنة أي تعديلات تجريها على تطبيق Obsidian على هاتفك أو حاسوبك الشخصي عبر حساب Google Drive الخاص بك في الوقت الفعلي. خزائن Obsidian خفيفة الوزن إلى حد كبير، وعادةً ما تكون خفيفة الوزن ولا تزيد عن بضعة ميغابايت، لذا لا داعي للقلق بشأن شغلها لمساحة كبيرة. أحد الأسباب التي قد تجعلك تتجنب مزودي الخدمات السحابية الخارجية هو أن بياناتك تخرج من بين يديك. فبالإضافة إلى فقدان بعض الخصوصية، إذا تم حظرك من الخدمة السحابية، فقد تفقد أيضًا مكتبة Obsidian بأكملها. وينطبق الشيء نفسه على تعطل ميزات التحكم في الإصدار والمزامنة من طرف المزود. إذا كنت لا تمانع في هذه المفاضلات، فبكل الوسائل، استخدم خدمتك السحابية المفضلة لديك. إذا كنت تريد المزيد من التحكم، انتقل إلى القسم التالي.
الطريقة الأفضل (ولكن الأطول) لمزامنة حسابك Obsidian
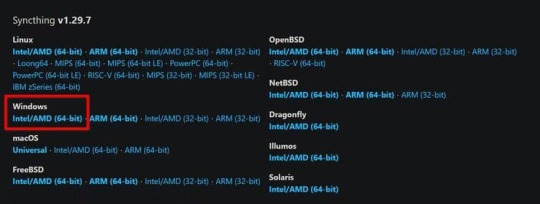
يمكنك أيضًا إعداد نظام مزامنة من نظير إلى نظير بين هاتفك وجهاز الكمبيوتر الذي لا يعتمد على السحابة. Syncthing مثالي لهذا الغرض. إنها أداة مفتوحة المصدر مع مئات المساهمين الذين يعملون بنشاط على تطوير هذا التطبيق وصيانته. وهو يعمل على كل منصة، ويمكنك الوصول إلى منتديات المجتمع النشطة إذا واجهتك أي مشكلة. سيتطلب الإعداد الأول القليل من الجهد، ولكن بمجرد تشغيله، سيحدث كل شيء في الخلفية. ما عليك سوى ضبطه ونسيانه. على جهاز الكمبيوتر الخاص بك توجه إلى موقع Syncthing على الويب واحصل على المثبت لنظامك. قم باستخراج الملف المضغوط وانقر نقرًا مزدوجًا على المثبت لتثبيت Syncthing على جهاز الكمبيوتر الخاص بك.


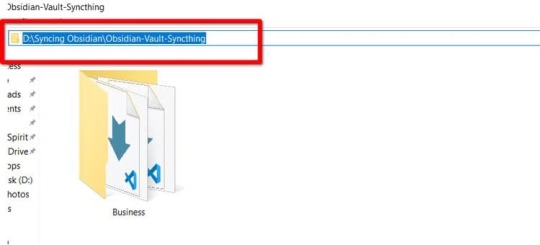
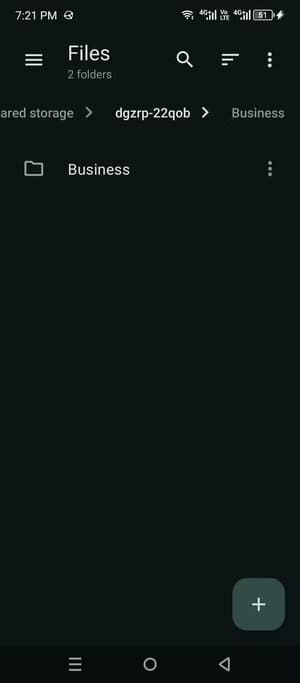
قم بتشغيله، ومن المفترض أن يقوم بتشغيل صفحة ويب على متصفحك الافتراضي. قد تبدو الواجهة مربكة إلى حد ما في البداية، لكنها في الواقع بسيطة للغاية. نبدأ بإنشاء مجلد جديد لوضع قبو Obsidian في مجلد جديد. أطلقتُ عليه اسم ”Obsidian-Vault-Syncthing“ ووضعتُ فيه مجلدًا جديدًا باسم ”الأعمال“. تسمية المجلد اختياري، ولكن لاحظ معرف المجلد، يجب أن يكون متطابقًا على كلا الجهازين. انتقل إلى علامة التبويب خيارات متقدمة للتأكد من أن نوع المجلد يقول ”إرسال واستقبال“.


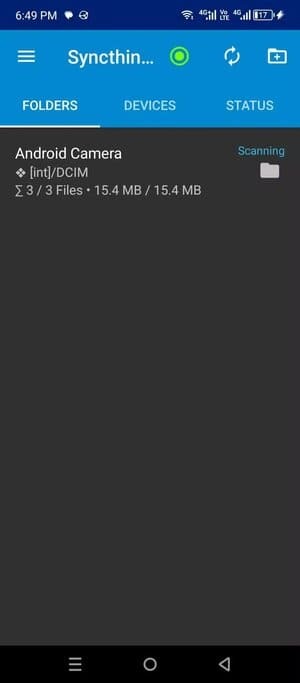
على هاتفك الآن، التقط هاتفك وقم بتثبيت Syncthing-Fork عليه. إنه تطبيق متاح على F-Droid ومتجر Google Play. سنقوم بتوصيله بتطبيق الكمبيوتر الشخصي ومشاركة مجلد Obsidian الذي وضعناه على وحدة تخزين الكمبيوتر.


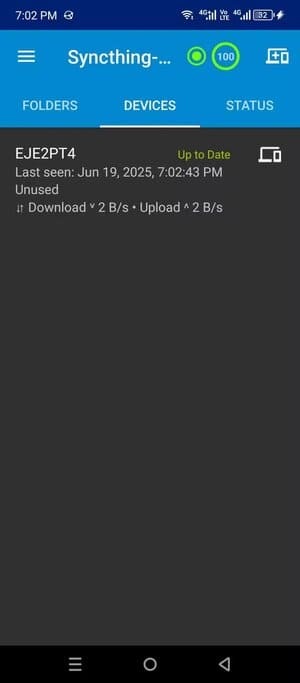
في علامة تبويب الأجهزة، اضغط على أيقونة إضافة أجهزة صغيرة في الأعلى وحدد المعرف المدرج، واختر موقع المجلد الذي ستخزن فيه الملفات التي تقبلها من الحاسوب، واضغط على علامة الاختيار لتأكيد الإضافة. يجب أن يظهر جهاز الكمبيوتر الخاص بك في علامة تبويب الأجهزة على الإنترنت. على جهاز الكمبيوتر الخاص بك وهاتفك الآن بعد أن تم توصيل هاتفك وجهاز الكمبيوتر الخاص بك، دعنا نرسل قبو Obsidian. انقر على زر التحرير وانتقل إلى علامة التبويب ”مشاركة“، وتحقق من اسم هاتفك.


التقط هاتفك مرة أخرى واقبل الطلب الذي أرسله جهاز الكمبيوتر الخاص بك لنقل الملف. اسحب ظل الإشعارات لأسفل وانقر على ”قبول“.


من المفترض أن يظهر مجلد Obsidian على تطبيق هاتفك Syncthing ويصبح متاحًا داخل مساحة تخزين هاتفك. بمجرد أن يستقر ذلك، ما عليك سوى المضي قدمًا وتحميل قبو Obsidian الخاص بك من هذا المجلد المحدد.


ها قد حصلت عليها: نظام مزامنة ملاحظات متعدد المنصات مبني بالكامل على شبكة نظير إلى نظير. يتطلب الأمر القليل من روح العمل الذاتي، ولكن هذا الإعداد Syncthing رائع لمزامنة الملاحظات بدون تكلفة. يمكن أن يعمل حتى مع تطبيقات تدوين الملاحظات الأخرى التي تعتمد على ملفات Markdown أو التخزين المحلي. إذا وجدت نفسك تنقل الملفات بانتظام بين هاتفك وحاسوبك الشخصي، فهذا الحل أفضل بكثير من إرسالها بالبريد الإلكتروني. للحصول على نظام أسهل (وأقل صعوبة)، لا يمكنك أن تخطئ في استخدام حل Google Drive. نقطة الاحتكاك الوحيدة التي وجدتها هي عدم قدرة تطبيق Google Drive على مزامنة الملفات المحلية مع خوادم Google. فالاعتماد على تطبيق خارجي لهذا الغرض يسلب بعضًا من عامل الروعة. ومع ذلك، سيعمل في حالات الضرورة. مزامنة Obsidian Notes بين الأجهزة لا تتطلب دائمًا الاشتراك في خدمات مدفوعة. باستخدام الأدوات المجانية التي استعرضناها، يمكنك الوصول إلى ملاحظاتك في أي وقت وبشكل آمن وسلس. الأهم هو اختيار الأداة التي تناسب نوع الأجهزة التي تستخدمها والبيئة التي تعمل فيها. إذا واجهت أي مشاكل أثناء الإعداد، يمكنك الرجوع إلى الخطوات المشروحة أو مشاركة تجربتك معنا في التعليقات. Read the full article
0 notes
Text
iCloud vs Google Drive: Which One Should You Use?
In today’s digital world, cloud storage is a must for keeping your files safe, synced, and accessible anywhere. Two of the biggest options are iCloud and Google Drive. Let’s see how they compare and which is better for you.
1. What They Are
iCloud
Apple’s cloud service for iPhone, iPad, and Mac users.
Great for backing up photos, contacts, notes, and device data.
Google Drive
Google’s cloud storage platform.
Works on any device – Android, iOS, Windows, Mac.
Best for storing files, sharing documents, and collaboration.
2. Storage and Pricing (India)
Google Drive gives more free storage and cheaper high-tier plans. iCloud doesn’t offer a 100GB plan.
3. Ease of Use
iCloud:
Perfect for Apple users.
Integrates smoothly with apps like Photos, Notes, and Mail.
Limited features on Windows and almost no use on Android.
Google Drive:
Works on all devices and operating systems.
Easy to upload, access, and manage files anywhere.
Integrated with Google Docs, Sheets, and Slides.
4. Collaboration
Google Drive is better for teamwork. You can edit, comment, and share files with anyone easily.
iCloud has limited collaboration only in Apple apps like Notes, Pages, and Numbers.
5. File Sharing
iCloud is smooth for sharing with other Apple users but limited for others.
Google Drive has flexible sharing options – public links, view-only, comment, or edit access.
6. Security and Privacy
FeatureiCloudGoogle DriveEncryptionEnd-to-end for some data; encrypted in transit and at restEncrypted in transit and at restPrivacyStrong Apple privacy policiesGoogle uses metadata for ad targetingTwo-Factor AuthYesYes
Note: Both are secure, but Apple focuses more on user privacy as a brand.
7. Special Features
iCloud
Apple One bundles (Music, TV+, Arcade, iCloud+).
Private Relay (VPN-like browsing).
Hide My Email for privacy.
Automatic device backups.
Google Drive
Works with Google Workspace (Docs, Sheets, Gmail).
Built-in OCR (reads text in images).
Powerful search features.
Easy team sharing and management.
8. Which Should You Choose?
Pick iCloud if:
You use only Apple devices.
You want automatic device backups.
You value Apple’s privacy-first approach.
Pick Google Drive if:
You use multiple devices (Android, Windows, Mac, iPhone).
You need to share and edit files with others often.
You want more free storage and flexible plans.
Final Thoughts
Both iCloud and Google Drive are excellent. For Apple-only users, iCloud is simple and seamless. For everyone else, Google Drive offers better flexibility, sharing, and collaboration.
FAQs
1. Can I use iCloud on Windows? Answer: Yes, through the iCloud Windows app.
2. Does Google Drive work on iPhone? Answer: Yes, via the Google Drive app.
3. Which is better for photos? Answer: iCloud for Apple Photos; Google Photos for better search and cross-device access.
4. Is my data safe? Answer: Yes, Both encrypt your data and offer two-factor authentication.
5. Can I change plans anytime? Answer: Yes, you can upgrade or downgrade anytime on both platforms.
Make the best use of cloud storage. Use iCloud for your Apple backups and Google Drive for sharing files and working with others easily.
Read More: iCloud vs Google Drive
0 notes
Text
What Is the Best Way to Prepare My Device Before Taking It to a Repair Shop in Cooper City in 2025?
If your device is acting up and it's time to visit a repair shop in Cooper City, proper preparation can make all the difference. Preparing your device not only protects your data and privacy but also ensures a smoother, faster repair process. Whether you're dealing with a cracked screen, battery issues, or software glitches, understanding how to ready your device is crucial. This comprehensive guide will walk you through effective steps to back up your data, secure your personal information, and choose the right repair service in Cooper City. Read on to safeguard your device and enjoy peace of mind before handing it over for repairs.
Understanding the Importance of Preparing Your Device for Repair
Taking the time to prepare your device before sending it off to a repair technician goes far beyond convenience. It is essential to avoid data loss, protect your privacy, and streamline the diagnostic and repair process. When devices go in unprepared, you risk losing important files such as photos, contacts, or work documents. Moreover, repair technicians often need access to certain device functions to diagnose issues efficiently, but you want to control what personal information they can view.
Successful device preparation helps maintain your security by minimizing risks of unauthorized access to sensitive accounts including email, social media, and banking apps. Additionally, it can save you money and hassle—some repair shops may charge extra if complications arise from missing data or locked devices.
Understanding these benefits motivates users in Cooper City to take a proactive approach. Being prepared makes it easier to communicate device issues, safeguards your digital life, and ensures you get the best possible service.
Steps to Prepare Your Device Before Visiting a Repair Shop Backing Up Your Data
Backing up your data is one of the most important steps before any repair. By creating a backup, you safeguard your valuable information against accidental loss.
Cloud Services: For Android users, Google Drive offers seamless backup of contacts, photos, and app data. Apple users can leverage iCloud to securely store their information. External Storage: Using an external hard drive or USB flash drive to save photos, videos, and documents adds an extra layer of protection independent of internet connectivity. Backup Apps: There are numerous third-party apps designed for full-device backups, which you can use depending on your device model.
Comparing backup options, cloud storage offers ease of access and automatic syncing but depends on internet speed and subscription limits. External storage guarantees physical control but requires manual transfers. Ideally, combine both methods for maximum security.
Resetting Factory Settings
Resetting your device to factory settings removes personal data https://storage.googleapis.com/techy-cooper-city/phone-repairs.html and settings that might interfere with the repair process.
Security Benefits: Performing a factory reset wipes sensitive data like passwords, saved accounts, and downloaded apps. How to Reset: Navigate to your device’s settings menu and select “Factory Reset” or “Erase
0 notes
Text
How To Make Sure Information On Your Old Computer Is Really, Truly Deleted
It Isn’t As Simple As Pressing ‘Delete’ And Emptying The Trash. Here’s A Step-By-Step Guide.
— By Sean Captain | June 17, 2025 | The Wall Street Journal (WSJ)

Illustration: Jon Krause
Spring-cleaning season is almost done, and it is time to finally get rid of that old computer. But be very careful before you sell, give away or recycle it.
You could be handing over sensitive information.
Even if you think you deleted everything on it, your old computer may hold lots of personal items you don’t want anyone seeing. In a 2019 study by the University of Hertfordshire (funded by security tech-reviews site Comparitech), researchers purchased 200 used hard drives from the U.S. and U.K. An analysis found data remaining on 59% of the drives, including passport and driver’s license scans, bank statements, utility bills and “intimate photos.”
Just pressing “delete” and emptying the Trash in macOS or the Recycle Bin in Windows won’t do the trick. That’s because your computer maintains an index of where every file resides. Deleting a file erases only its entry in the index, telling your system that it can put new files in that space. But until the system actually does put new files there, the old ones remain accessible. Simple consumer-level file-recovery apps can get at it—never mind professional-grade forensic software.
Here’s how to make sure your data is really gone—even on a computer that won’t start up.
Back-up And Log Out
Start by backing up anything you want to keep. You could drag files onto an external hard drive or use backup software such as the Time Machine app in macsOS. You can also back up to the cloud using Microsoft OneDrive, Apple iCloud, Google Drive, Dropbox or other services. (Don’t empty the Trash or Recycling bin. The wipe process will take care of this.)
Next, log out of applications or games with an online component, so the license is no longer associated with your old computer. Also do this for services like Gmail or Facebook, and web browsers like Chrome that sync your data online—on the admittedly remote chance that an incomplete wipe allows the next owner to access those accounts.
Another step for any type of computer is making sure your files are encrypted—scrambled in a mathematical operation based on very long strings of random numbers and letters called encryption keys. The wiping process will delete the keys to make sure any files that may remain on the machine are unreadable.
What you do next depends on your operating system.
Clearing Out A PC
Windows 10 and the current Windows 11 have a feature called “Reset this PC,” which, with the right settings, thoroughly wipes your data. First, make sure your operating system is up-to-date, as Microsoft recently fixed a bug that sometimes caused the reset process to fail. Press the Windows key, search for “updates” and select “Check for updates.” Install any that are available.
Now check on encryption. In Windows 10 or 11 Home editions, press the Windows key and search for “device encryption settings.” Click “Device encryption settings” on the next screen, then make sure the switch next to “Device encryption” is toggled on. Windows Pro, Enterprise and Education editions have an encryption utility called BitLocker. To enable it, click the Start button, type “bitlocker” and select “Manage BitLocker” from the list of results. (All versions of Windows 10 and 11 also encrypt deleted files.)
Now you’re ready to wipe. Tap the Windows key again, search for “Reset this PC,” then click on it. On the next screen, tap “Reset PC” (Windows 11) or “Get started” (Windows 10), and on the following screen, click “Remove everything.” On the next screen, select “Local reinstall.” (If this doesn’t work, try the “Cloud download” option.) Then click “Change settings,” and on the following screen (under “Clean data?”), toggle the switch to “Yes” and press “Confirm.” On the following screen, press “Next” (Windows 11) or “Reset” (Windows 10). On Windows 11, you will press “Reset” on one more screen. Then let the process run for a few hours.
“Reset this PC” deletes your files, apps and settings, logs you out of your Microsoft account and disables the “Find My Device” feature so the computer is no longer associated with you. Then the serious wiping starts. The encryption keys are deleted, making any encrypted data irretrievably scrambled, and the Clean data option overwrites the ones and zeros that had encoded data on your drive. A clean copy of Windows is also installed.
The MacOS Method
Apple’s “Erase Assistant” feature made its debut in 2021’s macOS 12 Monterey. If your current OS is older, you may be able to update it. To update an older OS to Monterey or a later one, click the Apple menu, then “System Preferences” and “Software Update.” If the update process doesn’t work, jump to “If all else fails” below for another option.
As with Windows, the “Erase All Content & Settings” process should start with encryption. On newer Macs (starting between 2018 and 2020, depending on the model), data is encrypted automatically. Just to be safe, though, turn on a feature called FileVault that adds encryption to older systems and an extra layer to newer ones. Click the Apple icon, then “System Settings” (or “System Preferences” in Monterey). In the next window, click “Privacy & Security” (or “Security & Privacy”), then click FileVault.
Now it is time to wipe. Click again on the Apple icon and “System Settings” (or “System Preferences”), click “General” on the left, then “Transfer or Reset” on the bottom right. Finally, on the next screen, click “Erase All Content & Settings.” (In Monterey, you’ll go there directly from “System Preferences.”)
This process signs you out of Apple services, turns off the “Find My” and “Activation Lock” security measures so that the system is no longer associated with you, and erases all your files, settings, apps and anything else. It deletes the encryption keys, permanently scrambling any data that remains.
If All Else Fails
If your PC or Mac is so old that it can’t run a modern wipe process, you have one more option before seeking pro help. For Windows, several experts recommended the KillDisk app. The $49.95 Professional version runs from a USB drive and overwrites the ones and zeros that encode data on your hard drive with all zeros. Afterward, your computer will no longer boot into Windows unless you reinstall the OS.
For a Mac, your best option is a complex process that Apple describes online.
If these processes sound too complicated, or if your system won’t even turn on, use Apple’s recycling program for Macs or a disposal company that offers hard-drive destruction (or shredding) and recycling for consumers with either type of system. Look for ones that issue a certificate of destruction to verify the process. For instance, Ship ‘N’ Shred accepts drives or whole devices, with prices that include shipping ranging from around $30 to $200.
Modern technology leaves a lot of digital footprints, but at least you can sweep them off your old computer.
— Sean Captain is a Writer ✍️ in New York.
#Technology#Personal Technology#Personal Information#Old Computer 💻 🖥️#Deleting Personal Data#‘Delete’ | Emptying The Trash#Step-By-Step Guide#Sean Captain#The Wall Street Journal (WSJ)
0 notes
Text
technology ramble
I’ve been getting a lot more picky about my tech lately. I’ve switched out some apps for other apps, ditched some tech altogether, and just generally been more thoughtful about what technology I use or allow to take up my time.
First off, I’ve been very much wanting everything to be local-first. Anything that is completely cloud-based is gonna be much more likely to be a no from me lately. I switched note apps to Obsidian, for example. I tried out getting a pocket notebook because that’s been a trend and I am open to more low-tech solutions to things lately, but ultimately it’s still a lot easier and quicker to pull out my phone to jot something down, especially if I’m also carrying something and need to take a note. But why Obsidian? Because the files just live in a folder. It’s not some weird proprietary situation where my notes exist only in Obsidian. My notes exist in files that I can open without Obsidian and move or copy however I’d like. I very much prefer that. Apple Notes is technically local, but it doesn’t offer any way of actually exporting all your notes. That is very much whack. Obsidian doesn’t even require you to export. They just live right there on your hard drive. They’re always exported. Never stuck in some proprietary format. That’s a huge plus in my book.
I’m not syncing my obsidian vault. I mainly use it on my phone to jot down any quick notes I need to throughout the day. I do also have the app on my gaming pc and my Macbook in case I need to type anything on those devices, but having my notes in the cloud isn’t really something that’s necessary for me I’ve found. Which is kind of a plus, because if I do need to jot down something sensitive like an account number or something, it’s not gonna immediately upload to some server that I have to trust. Another plus in my book. My former notes app, UpNote, isn’t bad. But I just honestly really love the way that Obsidian creates a folder and stores actual text files in that folder. That’s the killer feature for me.
I’ve also ditched Google Photos. I just have my pictures on my Macbook primarily now. I sync my Mac photo library to my iPhone using Finder (not iCloud). I’m also going to upload a copy of everything to Google Drive every now and then probably, just as a backup in case something were to happen to my laptop.
Why switch from Google Photos to Google Drive for the backup? Because I don’t want to have to use Takeout to download the backup if I need it. I don’t want Google to organize them or modify the files in any way. I just want them to sit in the cloud in case I some day need a backup of my pictures. Google Photos does seem to modify the files. If I request all my pictures through Takeout and try to import them back into Apple Photos, they won’t be in the proper order. That’s a no go for me. Eventually I might look into if there’s a cheaper solution for cloud storage that I’m only going to be using as a backup and not for syncing and ditch Google altogether.
I’ve ditched most social media, including TikTok (it’s not banned, right?). I obviously have kept tumblr but I don’t have it on my phone (I used Obsidian on my phone to write this and then copied it over to my laptop to post). Reddit was probably the last survivor other than tumblr, but I’m glad I ditched it. I would read tons of comments and get pissed off often. I’m way better off reading on my Kindle than I am opening Reddit. It’s 10:15 and I have only an hour and a half of screen time today. 30 minutes of that was ordering groceries from Target. 20 minutes checking the news in safari - which is a habit I’d like to stop. I only open the news on my phone because I want to mindlessly scroll. I still want to stay informed, but I want to do it at my PC and be more intentional about what I read rather than just opening Google News on my phone and scrolling. 15 minutes in the weather app and a few minutes each in Discord, Messages, and Spotify. Basically, I’m doing a lot less time wasting on my phone. Honestly I think I could see that number going down even more.
A lot of that time is going into reading since I bought a Kindle recently. Which I think is a much better use of my time, since before I’d likely just waste time on Reddit or before that TikTok and not come out of it with anything that was even that interesting. It’s definitely a good trade. I’m also watching more actual media, like TV shows and even some movies. Even a tv show is a better use of my free time than TikTok. Maybe not a ton better, but if I spend an hour watching tv I’m probably gonna feel like I enjoyed it more at the end than if I spent that hour watching TikTok.
Subscriptions are definitely on the chopping block. The only ones that have survived are Spotify and Fastmail. Those are both pretty valuable to me, but I could see myself possibly getting rid of Fastmail in the future. I use it because I have my own domain I use for my email address. I kind of like having that, because it means I am extremely unlikely to ever lose access to it. But I’m not 100% thrilled about paying for email. So eventually what I might end up doing is just setting up forwarding through my domain registrar so I can continue to use my custom domain email when I’m registering accounts online, but cancel Fastmail since I don’t need to send from my custom email very often and could proooooobably settle for a Gmail address when I do need to send email. But for now I am not ready to let my custom email go.
I also could get rid of Spotify in the future and just put MP3s or FLACs on either my phone or even possibly a dedicated device, but for now I am happy with the organization I get from Spotify. I’m not always in the mood to listen to my entire library shuffled, and Spotify makes it easy to listen to specific vibes.
Alrighty I think I’m done rambling. I have started writing this post several times and failed because I wasn’t sure how to organize it. But I’ve been wanting to write a bunch of this out for my blog because I have changed a lot of my tech habits recently and I think it’s been for the better.
[update, 2 hours later]
Actually I'm not totally done rambling. I also got rid of my self-hosted blog, mainly because I decided I didn't want to pay for it because like I said I am not really vibing with subscriptions. I've settled on using tumblr as my main blogging platform, mainly because I already have posts here and it's free. I'm keeping all my future posts locally on my PC in an Obsidian vault, too. At least the ones like this one. Not really that concerned with saving the TV screenshots I share. I also have been journaling in an actual paper notebook. I'm trying to write at least something in that every day. So in a way that has been a sort of replacement for my blog. Tumblr is definitely not perfect as a blogging platform but it gets a lot of points for being free. It's also nice that it has a community built-in. I also do like being able to reblog stuff so my blog isn't just my posts but kind of just a collection of stuff I like. It's got pros and cons. Not being in complete control of it is not ideal, but that's why for anything long or important that I post I'll keep a copy of it on my PC.
Anyway. Now maybe I'm actually done rambling about tech. For now.
If you're still reading I'll leave you with a book recommendation: Careless People by Sarah Wynn-Williams :)
1 note
·
View note
Text
Edit PDF on iPad with Pencil: A Professional’s Guide to Digital Productivity
In today’s mobile-first world, professionals are increasingly turning to tablets for handling documents on the go. Among all tablet ecosystems, the iPad—especially when paired with the Apple Pencil—has become the preferred choice for editing PDFs with precision and ease. If you’re wondering how to edit PDF on iPad with Pencil, this guide will walk you through everything you need to know, from tools and apps to workflows and productivity hacks.
Whether you’re signing contracts, annotating legal documents, grading student assignments, or collaborating on project blueprints, learning how to effectively edit PDF on iPad with Pencil can significantly enhance your efficiency and digital workflow.
Why Use iPad and Apple Pencil to Edit PDFs?
Professionals across industries—legal, education, architecture, healthcare, and creative fields—need to interact with PDFs daily. But what makes the iPad and Apple Pencil such a powerful combo?
Benefits include:
Precision Annotation: Apple Pencil allows fine, natural handwriting and drawing, ideal for detailed markups.
Paperless Workflow: Editing PDFs digitally reduces printing costs and improves file management.
On-the-Go Efficiency: Access, edit, and sign documents from anywhere, no scanner or printer needed.
App Integration: Syncs with cloud services like iCloud, Dropbox, OneDrive, and Google Drive.
Best Apps to Edit PDF on iPad with Pencil
While iPadOS includes basic tools to markup PDFs, the real power comes from professional-grade apps. Here’s a breakdown of the top options for anyone serious about document editing.
1. Apple’s Markup Tool (Built-in)
How it works: Open any PDF in the Files app or Mail, tap the Markup icon (pen tip), and use the Apple Pencil to sign, write, highlight, or draw.
Pros: Free, built-in, quick access.
Cons: Limited editing capabilities; better suited for simple annotations.
2. GoodNotes
Features: Import PDFs, annotate with Apple Pencil, organize notebooks, and search handwritten notes.
Best for: Professionals who like a notebook-style interface and need structured document organization.
3. Notability
Features: PDF annotation, voice notes, multi-note support, and automatic cloud backup.
Best for: Teachers, students, and professionals needing multimedia note integration.
4. PDF Expert by Readdle
Features: Advanced annotation tools, text editing, form filling, password protection, file merging.
Best for: Legal professionals, administrators, and power users who deal with large volumes of documents.
5. Adobe Acrobat Reader
Features: Full PDF support, syncing with Adobe Document Cloud, editing, signing, and commenting.
Best for: Users already embedded in Adobe’s ecosystem.
How to Edit PDF on iPad with Pencil – Step-by-Step
Now, let’s walk through how you can edit PDF on iPad with Pencil using Apple’s native tools and third-party apps. The process is straightforward but varies slightly based on your choice of app.
Using Apple’s Markup Tool:
Open the Files app and locate your PDF.
Tap to open it.
Tap the Markup icon (pen tip in a circle).
Use your Apple Pencil to write, highlight, or draw.
Tap Done to save changes automatically.
Using PDF Expert:
Open the PDF in PDF Expert.
Tap the Annotate tab.
Use the Apple Pencil to highlight, underline, comment, or draw.
To edit text, tap the Edit tool, then select the text field.
Save or export to cloud storage when finished.
Using Notability or GoodNotes:
Import the PDF into the app from Files or a cloud service.
Select the Pen, Highlighter, or Eraser tools.
Annotate freely with your Pencil.
Use the Lasso Tool to move or resize handwritten notes.
Export as a new PDF with annotations included.
Advanced PDF Editing Tasks on iPad
With the right app, you can do much more than just annotate. Here are some advanced capabilities:
✅ Fill Out Forms
Use fillable PDFs to input data directly using the Pencil or keyboard.
Apps like PDF Expert and Adobe Acrobat recognize text fields.
✅ Sign Documents
Create a signature using your Apple Pencil.
Save your signature for quick reuse in future documents.
✅ Merge & Split PDFs
Combine multiple documents into one PDF file.
Extract individual pages as needed for sharing or archiving.
✅ OCR and Search Handwriting
Apps like Notability and GoodNotes convert handwriting to text (OCR).
Useful for creating searchable notes from meeting or class annotations.
Best Practices for Professionals
To make the most of editing PDFs on iPad with Apple Pencil, keep these tips in mind:
1. Use iCloud or Dropbox Syncing
Ensure all your documents are automatically backed up and available across devices.
2. Invest in a Screen Protector (like Paperlike)
This improves writing feel and reduces glare when using the Pencil extensively.
3. Organize with Folders and Tags
Use file naming conventions and folders to keep documents categorized and easy to retrieve.
4. Use Keyboard Shortcuts (iPad Magic Keyboard)
For advanced users, combining the Apple Pencil with a keyboard increases productivity—especially in apps like PDF Expert or Notability.
Use Cases by Profession
📄 Lawyers
Sign contracts.
Highlight key clauses.
Organize client documentation.
🎓 Educators
Grade papers.
Annotate student submissions.
Share feedback instantly.
💼 Business Executives
Approve proposals on the go.
Annotate financial reports during meetings.
Sign NDAs or HR documents.
👩⚕️ Medical Professionals
Fill and annotate patient intake forms.
Share test result summaries.
Record handwritten notes digitally.
Security Considerations
Professionals must prioritize data privacy when editing sensitive PDFs. Here’s how:
Use apps with encryption and password protection (like PDF Expert).
Avoid using public Wi-Fi without a VPN when sharing files.
Turn on Face ID or Touch ID to secure document access.
Future of PDF Editing on iPad with Pencil
Apple continues to evolve iPadOS, and each update brings more powerful features to support professional workflows. Features like Stage Manager, Split View, and Universal Clipboard make it easier than ever to handle multiple documents, copy content between devices, and transition between mobile and desktop environments seamlessly.
Additionally, improvements to the Apple Pencil (like hover detection on iPad Pro M2 models) suggest a future where precision editing and document interaction will be even more intuitive.
Conclusion
Learning to edit PDF on iPad with Pencil is not just a productivity boost—it's a competitive advantage. For professionals across industries, mastering this workflow means faster document turnaround, reduced reliance on printing, and seamless collaboration from anywhere.
Whether you're annotating blueprints, grading reports, or signing NDAs in a client meeting, your iPad and Apple Pencil are all you need to get the job done with precision and style.
Invest in the right apps, follow best practices, and enjoy a truly paperless, high-performance workflow that keeps pace with your professional demands.
0 notes
Text
How to Use a Digital Planner on GoodNotes & Notability: A Beginner's Guide
Are you new to the world of digital planning? Whether you just bought your first iPad or want to switch from traditional paper planners, this guide will walk you through how to use a digital planner in GoodNotes and Notability—two of the most popular annotation apps available today.
Digital planning is a fun, eco-friendly, and highly customizable way to stay organized. And the best part? You can start immediately with tools you already have and a beautifully designed planner from Digital Softech.
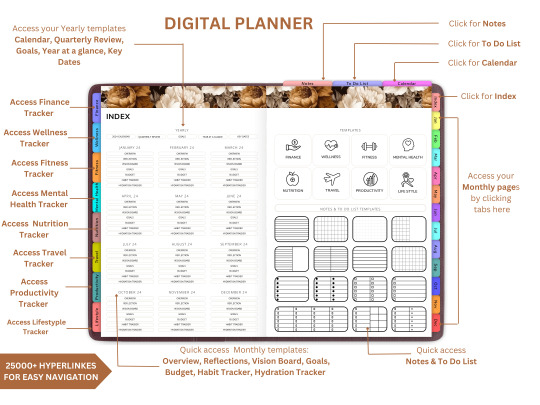
What Is a Digital Planner?
A digital planner is a PDF-based planner that mimics the layout and functionality of a traditional paper planner but is designed to be used on tablets. With apps like GoodNotes and Notability, you can annotate your planner using a stylus (like the Apple Pencil), just like writing on paper—but with endless digital advantages.
Why Use GoodNotes or Notability?
Both GoodNotes and Notability are powerful, user-friendly apps that support handwriting, highlighting, and hyperlinking. They're perfect for digital planning because they allow:
Seamless writing with a stylus
Easy importing of PDF planner files
Customization with stickers, images, and templates
Hyperlink navigation between planner pages
Tip: Start with GoodNotes if you prefer a notebook-like layout, or choose Notability for audio-note syncing and multi-media features.
What You Need to Get Started
Here’s your digital planner starter kit:
An iPad or compatible tablet
A stylus (Apple Pencil is ideal)
GoodNotes or Notability app
A digital planner PDF (available at Digital Softech)
Step-by-Step: Using a Digital Planner in GoodNotes
1. Download Your Planner
After purchasing or downloading a free digital planner from Digital Softech, save the PDF to your iPad.
2. Import into GoodNotes
Open GoodNotes
Tap the "+" icon > Import
Choose your downloaded planner PDF
Your planner is now ready to use
3. Learn the Interface
GoodNotes has tools like:
Pen and Highlighter
Eraser and Lasso Tool
Shape Tool
Text Box
Tip: Use the Lasso tool to move stickers or notes around your planner easily.
4. Navigate with Hyperlinks
Most planners from Digital Softech are hyperlinked—tap on dates or tabs to instantly jump to different sections.
5. Customize with Stickers & Inserts
Drag and drop PNG stickers into your planner
Copy-paste weekly inserts or habit trackers
6. Sync Across Devices
Enable iCloud sync to access your planner on iPhone, Mac, or multiple iPads.
Step-by-Step: Using a Digital Planner in Notability
1. Download Your Planner
Download the planner PDF from Digital Softech and save it to your iPad.
2. Import into Notability
Open Notability
Tap the Import icon (arrow)
Choose your planner file
3. Use Annotation Tools
Notability offers:
Pen, Highlighter, and Eraser
Voice Recording
Media Insertion (images, web clips)
Tip: You can record meetings while writing in your planner—great for students and professionals!
4. Customize Your Layout
Drag in extra templates or sticker sets to decorate your weekly and monthly views.
5. Secure and Backup
Enable automatic iCloud backup or Google Drive integration to never lose your notes.
Digital Planning Tips for Beginners
Set a Routine: Plan daily or weekly to stay on track.
Use Colors Strategically: Color-code tasks or priorities for clarity.
Add Digital Stickers: These add personality and can even act as reminders or labels.
Try Layering: Add sticky notes, checklists, and text boxes on top of your planner pages.
Practice Makes Perfect: It might feel new at first, but give yourself a week to adjust.
Common Mistakes to Avoid
Not Backing Up Your Planner: Always sync or export regularly.
Overloading Your Layout: Keep things clean and readable.
Skipping the Tutorial: Apps like GoodNotes and Notability have guides—use them!
Bonus: Where to Get the Best Digital Planners
At Digital Softech, we specialize in premium, easy-to-use digital planners designed for both beginners and seasoned users. Our planners are:
Hyperlinked for easy navigation
Aesthetic and minimal
Affordable and reusable
Whether you want a daily planner, wellness tracker, goal-setting template, or student planner—we’ve got it all.
Explore now: https://digitalsoftech.com
Final Thoughts
Learning how to use a digital planner with GoodNotes or Notability can truly transform your productivity. With a bit of practice, you’ll be planning smarter, faster, and more creatively. From hyperlinks to stickers, the digital planner world is full of possibilities.
Ready to get started? Visit Digital Softech and download a digital planner that fits your style and needs. Your perfect planning experience is just a tap away!
1 note
·
View note
Text
WhatsApp Data: The Engine Behind the World’s Most Popular Messaging App
Introduction
WhatsApp has become a cornerstone of digital communication, boasting over 2 billion active users globally. Whether it's a casual chat, a voice call, or a business inquiry, WhatsApp handles billions of interactions every day. Behind this seamless experience lies a massive amount of data—WhatsApp data—that powers the platform's functionality, user experience, security, and business capabilities.
From simple text messages to whatsapp data metadata and cloud backups, WhatsApp data encompasses a broad spectrum of digital footprints. In this article, we dive into what WhatsApp data includes, how it is used, what privacy concerns exist, and how individuals and organizations can leverage and protect it.
What is WhatsApp Data?
WhatsApp data refers to all forms of information generated, transmitted, stored, or processed through the WhatsApp platform. This includes:
1. User Data
Name, profile picture, status message
Phone number and contact list
Device type and IP address
Account settings (e.g., last seen, read receipts)
2. Message Content
Text messages
Voice messages
Images, videos, and documents
Stickers, GIFs, emojis
3. Call and Interaction Logs
Voice and video call history
Message timestamps
Message delivery and read receipts
4. Metadata
Information about messages (but not their content)
Who sent a message, to whom, at what time, from which device and IP address
Group memberships and group activity logs
5. Backup Data
Chats backed up to Google Drive (Android) or iCloud (iOS)
Media files included in backup, depending on user preferences
6. WhatsApp Business Data
Business profiles and catalogues
Automated messages (greetings, away messages, quick replies)
Customer interaction logs and analytics
How WhatsApp Uses Your Data
Although WhatsApp touts end-to-end encryption as a hallmark of its security model, the platform still uses and processes certain types of data for specific functions:
1. Message Delivery

Data ensures that messages are routed correctly from sender to receiver in a secure and timely manner.
2. Syncing Across Devices
With the multi-device feature, WhatsApp data is synced securely across multiple devices to ensure a consistent experience.
3. Spam and Abuse Detection
Metadata is analyzed to identify suspicious behavior such as bulk messaging, spam, or harassment.
4. Feature Enhancement
User interaction data helps WhatsApp improve features, fix bugs, and enhance performance.
5. Integration with Meta Ecosystem
While WhatsApp content remains encrypted, metadata (like device info and usage frequency) may be shared with Meta (its parent company) to personalize experiences on Facebook and Instagram, unless users opt out.
WhatsApp and Privacy: What’s at Stake?
Privacy has been at the heart of public debate around WhatsApp, especially after its 2021 privacy policy update. Here are the key privacy considerations related to WhatsApp data:
1. End-to-End Encryption
All messages, voice calls, and video calls on WhatsApp are end-to-end encrypted by default. This means only the sender and receiver can read or listen to the content—not even WhatsApp or Meta.
2. Metadata Collection
While message content is encrypted, metadata is not. This includes information about who you contacted, when, how often, and your location data inferred through IP addresses.
3. Data Sharing with Meta
In certain regions, WhatsApp shares user metadata with Meta for advertising and business intelligence. The specifics depend on the local legal framework and user consent.
4. Backup Security
Messages stored in cloud backups (Google Drive or iCloud) are not always encrypted unless the user enables encrypted backups. These backups can potentially be accessed by third parties, including law enforcement.
5. Group Privacy
While groups are secure, your phone number and profile picture are visible to all group members unless privacy settings are configured properly.
Downloading and Managing Your WhatsApp Data
WhatsApp allows users to download a report of their account information under the “Request Account Info” feature. This report includes:
Account creation date
Linked devices
Privacy settings
Profile information
Group memberships
However, it does not include message content or media files. For that, users must use chat export features or backups.
WhatsApp Business and Data Analytics
WhatsApp Business is designed for small to large businesses to engage with customers using automated, secure, and rich communication. The data collected here is incredibly valuable for customer service, marketing, and analytics.
1. Customer Data
Businesses collect names, contact details, and chat history, which help personalize support and product offerings.
2. Interaction Metrics
Metrics like response time, message delivery rates, read receipts, and customer engagement can be analyzed to improve performance.
3. APIs and CRM Integration
The WhatsApp Business API allows integration with CRMs and helpdesk software, enabling advanced data analysis and automation.
How Businesses Use WhatsApp Data
1. Customer Support
Brands like airlines, banks, and e-commerce platforms use WhatsApp to resolve customer queries, issue tickets, and provide real-time updates.
2. Transactional Messaging
Order confirmations, shipping updates, appointment reminders, and more are sent via WhatsApp using templates.
3. Marketing Campaigns
Although highly regulated, WhatsApp allows businesses to engage users with promotional content after explicit consent is provided.
4. Feedback and Surveys
Businesses use WhatsApp to gather customer feedback, often in the form of polls or NPS (Net Promoter Score) surveys.
Legal and Compliance Considerations
With great data comes great responsibility. WhatsApp data usage must comply with regional and international data protection laws.
GDPR (Europe)
Users must consent to data processing
Have the right to data access, correction, and deletion
Businesses must secure personal data and report breaches
CCPA (California)
Consumers have the right to know what data is collected and why
Businesses must disclose how WhatsApp data is shared or sold
DPDP (India)
Emphasizes data minimization, storage limitation, and user consent
WhatsApp faced scrutiny in India over its data-sharing policy with Meta
Security Risks Associated with WhatsApp Data
Despite its security architecture, WhatsApp data can still be at risk from:
1. Phishing and Malware
Scammers use WhatsApp to send fraudulent links that can steal data or install spyware.
2. SIM Swap Attacks
Hackers who gain control over a user’s SIM card can access WhatsApp accounts through OTP-based authentication.
3. Device Theft
If your phone is unlocked or your WhatsApp is not password-protected, anyone can access your messages and media.
4. Unencrypted Backups
If not encrypted, backups on cloud platforms can be a vulnerability point.
Best Practices to Protect WhatsApp Data
Enable Two-Step Verification Add an extra PIN code to prevent unauthorized access.
Use Encrypted Backups Turn on end-to-end encrypted backups in WhatsApp settings.
Be Cautious With Group Sharing Review group members before sharing sensitive information.
Manage Privacy Settings Control who sees your last seen, profile picture, about info, and status.
Avoid Clicking on Unknown Links Prevent phishing and potential malware by being cautious with messages from unknown contacts.
The Future of WhatsApp Data
As WhatsApp continues to expand its functionality—from payments in India and Brazil to desktop enhancements—its data ecosystem will grow even more complex.
1. AI and Chatbots
AI-driven chatbots will increasingly use WhatsApp data to offer personalized customer service and automate interactions.
2. Payments and Financial Data
With in-app payments, WhatsApp will handle sensitive financial data, requiring even stricter privacy protocols.
3. Enterprise-Grade Analytics
Large organizations will use business APIs and WhatsApp data analytics to streamline operations and customer journeys.
4. Greater Regulation
Expect tighter regulations and scrutiny over how WhatsApp and Meta handle user data, especially in the EU and Asia.
Thanks for reading..
SEO Expate Bangladesh Ltd.
0 notes